User:Utl jung/sandbox/LD40807
Going in
[edit]This session will cover:
- What you need to know about Wiki markup (or Wikitext) to edit comfortably enough in most situations
- Topics are broken out by task (e.g. formatting, linking, communicating with other editors) and include exercises
- We will cover templates in greater depth during August's second Wikidata Working Hours session (Monday 17th).
- Tips and tricks for making Wiki markup editing work for you
This session will be useful if:
- You have mostly edited Wikipedia (or some other Wikimedia project) with the Visual Editor, and have limited experience with the text (source) editor
- You find the source view of Wikimedia projects confusing or complicated
- You are somewhat familiar with the content, but wish to revisit it or just want some practice
- You're a Wiki markup master but you've stepped away for six years and would like a refresher
You will need:
- This page, for reference
- A page in your sandbox where you can practise
- Copy over the contents of User:Utl_jung/sandbox/LD40807try
- To make a new sandbox page, simply "create a new file" by writing /something after /sandbox in the URL
- For example: https://en.wikipedia.org/wiki/User:Utl_jung/sandbox/workinghour1 allows me to start that page
Basics
[edit]Wiki markup (or Wikitext) is one of many lightweight markup languages (LML) that prioritise human readability.
- Wiki markup works across all MediaWiki-based platforms, including all Wikimedia projects and other wikis built on MediaWiki
- Wikibase, the software behind Wikidata, is a specially developed instance of MediaWiki and also uses Wiki markup (e.g. today's working hour page)
- We are editing on Wikipedia today because Wikipedia allows us the luxury of a sandbox!
- Technically, Wikitext refers to text snippets or documents written in the Wiki markup language. But many use the terms interchangeably.
- Other LMLs include Markdown and GitHub Flavored Markdown.
- By comparison, HTML allows you to do more things but compromises on human readability.
Here is a table demonstrating how Wiki Markup compares to HTML (from Wiki#Basic syntax):
As we begin, you may find it helpful to turn on syntax highlighting!
- This feature colours your syntax to make it easier (and more fun!) to use Wikitext.
- To enable it, toggle the button (
 ) that appears in the toolbar.
 - If you're curious about how this works, see: Extension:CodeMirror.
Formatting
[edit]Characters
[edit]- Bold: Use three apostrophes(') on either side.
'''foo''' - Italics: Use two apostrophes(') on either side.
''foo'' - Bold + Italics: Use five apostrophes(') on either side.
'''''foo''''' Strikethrough: Use the template {{strikethrough}}.{{strikethrough|foo}}- Underline: Use the template {{underline}}.
{{underline|foo}} - small caps: Use the template {{smallcaps}}.
{{smallcaps|foo}}
Formatting a link
[edit]To format a link, add the apostrophes around the parentheses: '''[[foo]]'''
If you do it the other way around, it will not work since the parentheses interpret the apostrophes as part of the page name.
Line breaks
[edit]- If you press ⌅ Enter once, it will place a line break in the markup but not in the rendered result.
- If you press ⌅ Enter twice, it will insert a line break in the rendered result.
- Lists are an exception. These require one, not two, markup line breaks.
- To insert a line break without pressing ⌅ Enter twice, type
<br>,<br/>, or {{pb}}. But, use sparingly.
Make lists
[edit]Bullet lists
[edit]* a * b ** c
produces:
- a
- b
- c
Numbered lists
[edit]# a # b ## c
produces:
- a
- b
- c
Link
[edit]Internal pages
[edit]- Use
[[foo]]to link to an article - Use a pipe (
|) to insert a parameter which changes what the link says. For example:[[Wikipedia:About]]gives Wikipedia:About[[Wikipedia:About|About page of Wikipedia]]gives About page of Wikipedia
Images
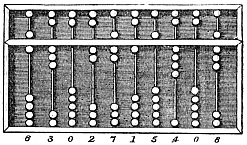
[edit]Link images in the same way that you would link any other internal page. For example, [[File:Abacus 6.png]] gives:
Extended syntax for an image looks something like this:
[[File:Name|Type|Border|Location|Alignment|Size|link=Link|alt=Alt|page=Page|lang=Langtag|Caption]]
Here, only File is technically necessary. Most images only require:
[[File:Name|thumb|alt=Alt|Caption]]
Here, thumb stands in for the size parameter.
Alt text
[edit]Please: always insert alt text! Alt text describes visual content for users of screen readers and other visual-to-auditory assistive technologies. Rule of thumb: write out alt text as if you're describing the image to someone in another room.
Other language Wikipedias
[edit]- Look up the two-letter language code per ISO 639-1.
- This is the same two-letter code at the beginning of the URL which takes you to that specific language Wikipedia.
- For example, en.wikipedia.org with the ISO 639-1 code en (English) takes you to the English Wikipedia.
- Use
:two-letter language code:article name to link directly to the other-language Wikipedia page- For example,
[[:fa:زرتشت]]gives fa:زرتشت. This is the Farsi page for Zarathustra - You can use what's called the "pipe trick" (add a pipe symbol(|) to the end of the article name) to have the output only display the article name
[[:fa:زرتشت|]]gives زرتشت
- Or, as you did in previous sections, use a pipe (
|) to insert a parameter which changes what the link says[[:fa:زرتشت|Zarathustra in Farsi]]gives Zarathustra in Farsi
- For example,
Pages that exist in other languages but not in English
[edit]- Use the template {{interlanguage link}} ({{ill}} for short) if you wish to link to the other-language article until the English article becomes available.
{{interlanguage link|INRS-Institut Armand-Frappier|fr}}gives INRS-Institut Armand-Frappier
Other Wikimedia projects
[edit]- Add a prefix (shortcuts available) before the page name to link to other Wikimedia projects. For example:
[[:wikt:toothbrush]]gives wikt:toothbrush[[:simple:toothbrush]]gives simple:toothbrush
- Remember: you can always change what the links say by using a pipe(|)!
- Sometimes, the prefixes don't work without a colon(:) at the beginning. You may have to play around with it a bit.
- See Help:Interwiki linking#Prefix codes for linking to Wikimedia sister projects for a comprehensive chart.
Wikidata and Reasonator
[edit]- Use the template {{Wikidata entity link}} ({{q}} or {{wde}} for short) to link to an existing Wikidata item.
{{q|Q20155952}}gives Reasonator (Q20155952){{q|P197}}gives adjacent station (P197)
- You can also use {{ill}} to display links to Wikidata and Reasonator! We will try with the item for Reasonator (Q20155952), since this does not currently have a Wikipedia page.
{{ill|Reasonator|wd=Q20155952}}gives Reasonator{{ill|Reasonator|wd=Q20155952|reasonator=1}}gives Reasonator{{ill|Reasonator|reasonator=1}}gives Reasonator- If no
|wd=is given, Reasonator will perform a search for the item. Note that this can be imprecise, and often requires disambiguation.
- If no
External links
[edit]- Use
[foo]to add an external, non-Wikimedia link- Technically, any link (even internal links) can be made this way, but the internal link rules (using
[[foo]]) make those look much cleaner
- Technically, any link (even internal links) can be made this way, but the internal link rules (using
- Use a space (
[https://insulin.library.utoronto.ca/]just gives [1][https://insulin.library.utoronto.ca/ Insulin Collection at the University of Toronto Libraries]gives Insulin Collection at the University of Toronto Libraries
Communication
[edit]Sign
[edit]- Signing is an etiquette on anonymous platforms! Use tildes(
~) to sign off on comments, add yourself to Wikiprojects, etc.
Ping
[edit]- You can notify ("ping") a user by making an edit that links to their user page.
- Typing
@Usernamewill not automatically ping the user.
- Typing
- There are many ways to do this. To use myself (User:Utl_jung) as an example, you can write:
Indent
[edit]On talk pages, add a colon(:) to indent every time you reply within a thread. For example:
Hello world! ~~~~
:I see your comment. ~~~~
::{{re|Utl_jung}} I, too, see your comment. ~~~~
produces:
Hello world! Utl jung (talk) 17:13, 7 August 2020 (UTC)
Outdent
[edit]Once there are too many indents, it can help to {{outdent}} ({{out}} for short) for better readability. For example:
[...]
:::::The latest in a long thread of comments. ~~~~
{{out|:::::}}{{re|Utl_jung}} Let's reset the indents for readability. ~~~~
produces:
[...]
@Utl jung: Let's reset the indents for readability. Utl jung (talk) 17:13, 7 August 2020 (UTC)
Documentation
[edit]When writing documentation, it can help to know a few templates and HTML snippets which make it easier to distinguish input from output.
- Use
<nowiki>...</nowiki>to escape all contained Wiki markup - Use
<code>...</code>to stylise contained text as code - Use
{{tl}}to write about a template without triggering the template itself- To use, write:
{{tl+|+ template name +}} - For example,
{{tl|archival records}}displays the link to, but does not trigger, {{archival records}}
- To use, write:
Transclusion
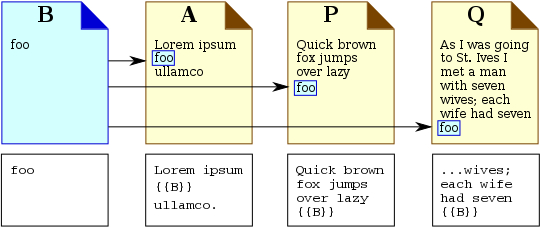
[edit]To transclude content from a source page (within a single MediaWiki project, such as English Wikipedia) onto a target page, use {{SOURCEPAGE}} in the target page's code.
Any time the code {{SOURCEPAGE}} is included on a target page, Wikipedia software places the entire content of SOURCEPAGE into that spot on the target page.
Example
[edit]Consider an example, complemented by the illustration below, with target pages A, P, and Q, and source page B.
If source page B is transcluded into A, the content from B (for instance, the word "foo") will appear in place of the {{B}} code in page A. When transcluded, this content is not highlighted or boxed on the target page – it is integrated directly into the page's text (highlighted here only for illustration).
How it works
[edit]Transclusion creates a 'live' link between a source page and all target pages where its content is transcluded to and used. Editing the source page automatically updates its content on all target pages that include it.
For example, if you create a source page with details about a Wikimedia event and transclude it onto the talk pages of 50 editors you wish to invite, any updates you make to the source page (such as changing the event location) will immediately reflect on all 50 talk pages.
Edit source pages with caution
[edit]Edits to a source page can impact all target pages using it. If a source page also contains its own transclusions from other source pages, avoid changes that may break these links, as this would affect the source page you are editing and all target pages that transclude it. This is known as 'breakage', and it is best to ensure any updates maintain the integrity of transcluded content across all pages. For example, Main Page is a large page that transcludes its content from multiple embed source pages such as Wikipedia:Today's featured list.
Journey ahead
[edit]Once comfortable with the basics of Wiki markup, I highly recommend that you reference these wonderful existing documentation pages to do more and more things with Wiki markup!
Nifty customisation!
[edit]- Syntax highlighter tool - allows custom coloured highlighting for Wiki markup syntax.
- Enable under Preferences (user toolbar in the top right) > Gadgets


