Probe tip
A probe tip is an instrument used in scanning probe microscopes (SPMs) to scan the surface of a sample and make nano-scale images of surfaces and structures. The probe tip is mounted on the end of a cantilever and can be as sharp as a single atom. In microscopy, probe tip geometry (length, width, shape, aspect ratio, and tip apex radius) and the composition (material properties) of both the tip and the surface being probed directly affect resolution and imaging quality. Tip size and shape are extremely important in monitoring and detecting interactions between surfaces. SPMs can precisely measure electrostatic forces, magnetic forces, chemical bonding, Van der Waals forces, and capillary forces. SPMs can also reveal the morphology and topography of a surface.
The use of probe-based tools began with the invention of scanning tunneling microscopy (STM) and atomic force microscopy (AFM), collectively called scanning probe microscopy (SPM) by Gerd Binnig and Heinrich Rohrer at the IBM Zurich research laboratory in 1982. It opened a new era for probing the nano-scale world of individual atoms and molecules as well as studying surface science, due to their unprecedented capability to characterize the mechanical, chemical, magnetic, and optical functionalities of various samples at nanometer-scale resolution in a vacuum, ambient, or fluid environment.
The increasing demand for sub-nanometer probe tips is attributable to their robustness and versatility. Applications of sub-nanometer probe tips exist in the fields of nanolithography, nanoelectronics, biosensor, electrochemistry, semiconductor, micromachining and biological studies.
History and development
[edit]Increasingly sharp probe tips have been of interest to researchers for applications in the material, life, and biological sciences, as they can map surface structure and material properties at molecular or atomic dimensions. The history of the probe tip can be traced back to 1859 with a predecessor of the modern gramophone, called the phonautograph. During the later development of the gramophone, the hog's hair used in the phonautograph was replaced with a needle used to reproduce sound. In 1940, a pantograph was built utilizing a shielded probe and adjustable tip. A stylus was free moving allowing it to slide vertically in contact with the paper.[1] In 1948, a circuit was employed in the probe tip to measure peak voltage, creating what may be considered the first scanning tunneling microscope (STM).[2] The fabrication of electrochemically etched sharp tungsten, copper, nickel and molybdenum tips were reported by Muller in 1937.[3] A revolution in sharp tips then occurred, producing a variety of tips with different shapes, sizes, and aspect ratios. They composed of tungsten wire, silicon, diamond and carbon nanotubes with Si-based circuit technologies.[clarification needed] This allowed the production of tips for numerous applications in the broad spectrum of nanotechnological fields.
Following the development of STM,[4] atomic force microscopy (AFM) was developed by Gerd Binnig, Calvin F. Quate, and Christoph Gerber in 1986.[5] Their instrument used a broken piece of diamond as the tip with a hand-cut gold foil cantilever. Focused ion and electron beam techniques for the fabrication of strong, stable, reproducible Si3N4 pyramidal tips with 1.0 μm length and 0.1 μm diameter were reported by Russell in 1992.[6] Significant advancement also came through the introduction of micro-fabrication methods for the creation of precise conical or pyramidal silicon and silicon nitride tips.[7] Numerous research experiments were conducted to explore fabrication of comparatively less expensive and more robust tungsten tips, focusing on a need to attain less than 50 nm radius of curvature.[8][9][10][11][12][13][14][15][16]
A new era in the field of fabrication of probe tips was reached when the carbon nanotube, an approximately 1 nm cylindrical shell of graphene, was introduced.[17] The use of single wall carbon nanotubes makes the tips more flexible and less vulnerable to breaking or crushing during imaging.[17] Probe tips made from carbon nano-tubes can be used to obtain high-resolution images of both soft and weakly adsorbed biomolecules like DNA on surfaces with molecular resolution.[18]
Multifunctional hydrogel nano-probe techniques also advanced tip fabrication and resulted in increased applicability for inorganic and biological samples in both air and liquid. The biggest advantage of this mechanical method is that the tip can be made in different shapes, such as hemispherical, embedded spherical, pyramidal, and distorted pyramidal, with diameters ranging from 10 nm – 1000 nm. This covers applications including topography or functional imaging, force spectroscopy on soft matter, biological, chemical and physical sensors.[19] Table 1. Summarizes various methods for fabricating probe tips, and the associated materials and applications.
| Fabrication Method(s) | Material(s) | Application(s) | References |
|---|---|---|---|
| Grinding, cutting, fracture, center aligned | Diamond | Nanoindentation, 2D profiling in semiconductor, doping type and concentration of native silicon oxide | [20][21] |
| Beam Ion Milling | Diamond | Local electrical characterization of thin metal–oxide–semiconductor dielectrics, conducting AFM | [22][23] |
| Field ion microscope(y) | SiOx, Si3N4, quartz | Nanoelectronics, bond strength in biomolecules | [24][25][26] |
| etching | W, W, Ag, Pt, Ir, Au | Semiconductor, nano-patterning, metal surface imaging | [9][27] |
| Hydrogel | Poly- (ethylene glycol) diacrylate | Biological soft and hard sample, dip-pen nanolithography | [19][28] |
| RIE-Reactive-ion etching | Diamond | Forces (SFM), optical properties (SNOM) | [29] |
| Glue | Polymers, carbon nanotube | Charge density waves on the surface of conducting material, imaging of single atom | [17] |
| Single atom functionalized | Single CO2 molecule attached to metal tip | Bond-order, catalysis, chemical structure | [30][31][32] |
| Electron beam deposition | Silicon | Lithography, high resolution imaging | [33] |
| Chemical vapor deposition | CNT, diamond | Electronic devices, Semi-conductor | [34][23][35] |
Tunneling current and force measurement principle
[edit]The tip itself does not have any working principle for imaging, but depending on the instrumentation, mode of application, and the nature of the sample under investigation, the probe's tip may follow different principles to image the surface of the sample. For example, when a tip is integrated with STM, it measures the tunneling current that arises from the interaction between the sample and the tip.[4][36] In AFM, short-ranged force deflection during the raster scan by the tip across the surface is measured.[5] A conductive tip is essential for the STM instrumentation whereas AFM can use conductive[37][20] and non-conductive[21] probe tip. Although the probe tip is used in various techniques with different principles, for STM and AFM coupled with probe tip is discussed in detail.[17][22][23][24][25]
Conductive probe tip
[edit]As the name implies, STM utilizes the tunneling charge transfer principle from tip to surface or vice versa, thereby recording the current response. This concept originates from a particle in a box concept; if potential energy for a particle is small, the electron may be found outside of the potential well, which is a classically forbidden region. This phenomenon is called tunneling.[26]
Expression derived from Schrödinger equation for transmission charge transfer probability is as follows:
where
- is the Planck constant
Non-conductive probe tip
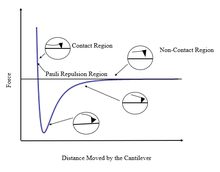
[edit]Non-conductive nanoscale tips are widely used for AFM measurements. For non-conducting tip, surface forces acting on the tip/cantilever are responsible for deflection or attraction of tip.[29] These attractive or repulsive forces are used for surface topology, chemical specifications, magnetic and electronic properties. The distance-dependent forces between substrate surface and tip are responsible for imaging in AFM.[38] These interactions include van der Waals forces, capillary forces, electrostatic forces, Casimir forces, and solvation forces. One unique repulsion force is Pauli Exclusion repulsive force,[32] which is responsible for single-atom imaging as in references[32][30][25] and Figures 10 & 11 (contact region in Fig. 1).
Fabrication methods
[edit]Tip fabrication techniques fall into two broad classifications, mechanical and physicochemical. In the early stage of the development of probe tips, mechanical procedures were popular because of the ease of fabrication.
Mechanical methods
[edit]Reported mechanical methods in fabricating tips include cutting,[39][40] grinding,[41][42] and pulling.;[43][44] an example would be cutting a wire at certain angles with a razor blade, wire cutter, or scissors.[40] Another mechanical method for tip preparation is fragmentation of bulk pieces into small pointy pieces. Grinding a metal wire or rod into a sharp tip was also a method used.[41][42] These mechanical procedures usually leave rugged surfaces with many tiny asperities protruding from the apex, which led to atomic resolution on flat surfaces. However, irregular shape and large macroscopic radius of curvature result in poor reproducibility and decreased stability especially for probing rough surfaces. Another main disadvantage of making probes by this method is that it creates many mini tips which lead to many different signals, yielding error in imaging.[45] Cutting, grinding and pulling procedures can only be adapted for metallic tips like W, Ag, Pt, Ir, Pt-Ir and gold. Non-metallic tips cannot be fabricated by these methods.
In contrast, a sophisticated mechanical method for tip fabrication is based on the hydro-gel method.[19] This method is based on a bottom-up strategy to make probe tips by a molecular self-assembly process. A cantilever is formed in a mould by curing the pre-polymer solution, then it is brought into contact with the mould of the tip which also contains the pre-polymer solution. The polymer is cured with ultraviolet light which helps to provide a firm attachment of the cantilever to the probe. This fabrication method is shown in Fig. 2.[19]
Physio-chemical procedures
[edit]Physiochemical procedures are fabrication methods of choice, which yield extremely sharp and symmetric tips, with more reproducibility compared to mechanical fabrication-based tips. Among physicochemical methods, the electrochemical etching method[11] is one of the most popular methods. Etching is a two or more step procedure. The "zone electropolishing" is the second step which further sharpens the tip in a very controlled manner. Other physicochemical methods include chemical vapor deposition[46] and electron beam deposition onto pre-existing tips.[47] Other tip fabrication methods include field ion microscopy[48] and ion milling.[49] In field ion microscopy techniques, consecutive field evaporation of single atoms yields specific atomic configuration at the probe tip, which yields very high resolution.[45]
Fabrication through etching
[edit]Electrochemical etching is one of the most widely accepted metallic probe tip fabrication methods.[12] Three commonly used electrochemical etching methods for tungsten tip fabrication are single lamella drop-off methods,[45] double lamella drop-off method,[16] and submerged method.[50] Various cone shape tips can be fabricated by this method by minor changes in the experimental setup. A DC potential is applied between the tip and a metallic electrode (usually W wire) immersed in solution (Figure 3 a-c); electrochemical reactions at cathode and anode in basic solutions (2M KOH or 2M NaOH) are usually used.[10] The overall etching process involved is as follows:
Anode;
Cathode:
Overall:
Here, all the potentials are reported vs. SHE.
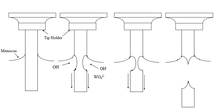
The schematics of the fabrication method of probe tip production through the electrochemical etching method is shown in Fig. 3.[51]
In the electrochemical etching process, W is etched at the liquid, solid, and air interface; this is due to surface tension, as shown in Fig. 3. Etching is called static if the W wire is kept stationary. Once the tip is etched, the lower part falls due to the lower tensile strength than the weight of the lower part of the wire. The irregular shape is produced by the shifting of the meniscus. However, slow etching rates can produce regular tips when the current flows slowly through the electrochemical cells. Dynamic etching involves slowly pulling up the wire from the solution, or sometimes the wire is moved up and down (oscillating wire) producing smooth tips.[14]
Submerged method
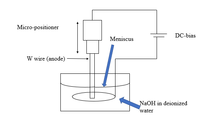
[edit]In this method, a metal wire is vertically etched, reducing the diameter from 0.25 mm ~ 20 nm. A schematic diagram for probe tip fabrication with submerged electrochemical etching method is illustrated in Fig 4. These tips can be used for high-quality STM images.[45]
Lamella method
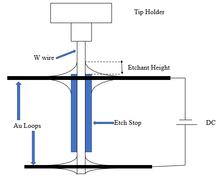
[edit]In the double lamella method, the lower part of the metal is etched away, and the upper part of the tip is not etched further.[16] Further etching of the upper part of the wire is prevented by covering it with a polymer coating. This method is usually limited to laboratory fabrication.[45] The double lamella method schematic is shown in Fig. 5.
Single atom tip preparation
[edit]Transitional metals like Cu, Au and Ag adsorb single molecules linearly on their surface due to weak van der Waals forces.[32] This linear projection of single molecules allows interactions of the terminal atoms of the tip with the atoms of the substrate, resulting in Pauli repulsion for single molecule or atom mapping studies. Gaseous deposition on the tip is carried out in an ultrahigh vacuum (5 x 10⁻⁸ mbar) chamber at a low temperature (10K). Depositions of Xe, Kr, NO, CH4 or CO [52] on tip have been successfully prepared and used for imaging studies. However, these tips preparations rely on the attachment of single atoms or molecules on the tip and the resulting atomic structure of the tip is not known exactly.[30][53] The probability of attachment of simple molecules on metal surfaces is very tedious and required great skill; as such, this method is not widely used.
Chemical vapor deposition (CVD)
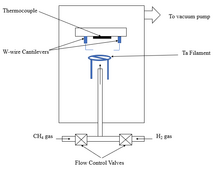
[edit]Sharp tips used in SPM are fragile, and prone to wear and tear under high working loads. Diamond is considered the best option to address this issue. Diamond tips for SPMs are fabricated by fracturing, grinding and polishing bulk diamond, resulting in a considerable loss of diamond.[54] One alternative is depositing a thin diamond film on Silicone tips by CVD.[55] In CVD, diamond is deposited directly on silicon or W cantilevers. A is shown in Fig. 6. In this method, the flow of methane and hydrogen gas is controlled to maintain an internal pressure of 40 Torr inside the chamber. CH4 and H2 dissociate at 2100 °C with the help of the Ta filament, and nucleation sites are created on the tip of the cantilever. Once CVD is complete, the flow of CH4 is stopped and the chamber is cooled under the flow of H2. A schematic diagram of a CVD setup used for diamond tip fabrication for AFM application is shown in Fig. 6.
Reactive ion etching (RIE) fabrication
[edit]A groove or structure is made on a substrate to form a template. The desired material is then deposited in that template. Once the tip is formed, the template is etched off, leaving the tip and cantilever. Fig. 7 illustrates diamond tip fabrication on silicon wafers using this method.[56]
Focused ion beam (FIB) milling
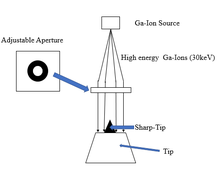
[edit]FIB milling is a sharpening method for probe tips in SPM. A blunt tip is first fabricated by other etching methods, such as CVD, or the use of a pyramid mold for pyramidal tips. This tip is then sharpened by FIB milling as shown in Fig. 8. The diameter of the focused ion beam, which directly affects the tip's final diameter, is controlled through a programmable aperture.[22]
Glue
[edit]This method is used to attach carbon nanotubes to a cantilever or blunt tip. A strong adhesive (such as soft acrylic glue) is used to bind CNT with the silicon cantilever. CNT is robust, stiff and increases the durability of probe tips, and can be used for both contact and tapping mode.[17][57]
Cleaning procedures
[edit]Electrochemically etched tips are usually covered with contaminants on their surfaces which cannot be removed simply by rinsing in water, acetone or ethanol. Some oxide layers on metallic tips, especially on tungsten, need to be removed by post-fabrication treatment.
Annealing
[edit]To clean W sharp tips, it is highly desirable to remove contaminant and the oxide layer. In this method a tip is heated in an UHV chamber at elevated temperature which desorb the contaminated layer. The reaction details are shown below.[58]
2WO3 + W → 3WO2 ↑
WO2 → W (sublimation at 1075K)
At elevated temperature, trioxides of W are converted to WO2 which sublimates around 1075K, and cleaned metallic W surfaces are left behind. An additional advantage provided by annealing is the healing of crystallographic defects produced by fabrication, and the process also smoothens the tip surface.
HF chemical cleaning
[edit]In the HF cleaning method, a freshly prepared tip is dipped in 15% concentrated hydrofluoric acid for 10 to 30 seconds, which dissolves the oxides of W.[59]
Ion milling
[edit]In this method, argon ions are directed at the tip surface to remove the contaminant layer by sputtering. The tip is rotated in a flux of argon ions at a certain angle, in a way that allows the beam to target the apex. The bombardment of ions at the tip depletes the contaminants and also results in a reduction of the radius of the tip.[22] The bombardment time needs to be finely tuned with respect to the shape of the tip. Sometimes, short annealing is required after ion milling.[58]
Self-sputtering
[edit]This method is very similar to ion milling, but in this procedure, the UHV chamber is filled with neon at a pressure of 10−4 mbar. When a negative voltage is applied on the tip, a strong electric field (produced by tip under negative potential) will ionize the neon gas, and these positively charged ions are accelerated back to the tip, where they cause sputtering. The sputtering removes contaminants and some atoms from the tip which, like ion milling, reduces the apex radius. By changing the field strength, one can tune the radius of the tip to 20 nm.[58]
Coating
[edit]The surface of silicon-based tips cannot be easily controlled because they usually carry the silanol group. The Si surface is hydrophilic and can be contaminated easily by the environment. Another disadvantage of Si tips is the wear and tear of the tip. It is important to coat the Si tip to prevent tip deterioration, and the tip coating may also enhance image quality. To coat a tip, an adhesive layer is pasted (usually chromium layer on 5 nm thick titanium) and then gold is deposited by vapor deposition (40-100 nm or less). Sometimes, the coating layer reduces the tunnelling current detection capability of probe tips.[58][60]
Characterization
[edit]The most important aspect of a probe tip is imaging the surfaces efficiently at nanometre dimensions. Some concerns involving credibility of the imaging or measurement of the sample arise when the shape of the tip is not determined accurately. For example, when an unknown tip is used to measure a linewidth pattern or other high aspect ratio feature of a surface, there may remain some confusion when determining the contribution of the tip and of the sample in the acquired image.[61] Consequently, it is important to fully and accurately characterize the tips. Probe tips can be characterized for their shape, size, sharpness, bluntness, aspect ratio, radius of curvature, geometry and composition using many advanced instrumental techniques.[19][40][50][62][63][64] For example, electron field emission measurement, scanning electron microscopy (SEM), transmission electron microscopy (TEM), scanning tunnelling spectroscopy as well as more easily accessible optical microscope. In some cases, optical microscopy cannot provide exact measurements for small tips in nanoscale due to the resolution limitation of the optical microscopy.
Electron field emission current measurement
[edit]In the electron field emission current measurement method, a high voltage is applied between the tip and another electrode, followed by measuring field emission current employing Fowler-Nordheim curves .[65] Large fields-emission current measurements may indicate that the tip is sharp, and low field-emission current indicates that the tip is blunt, molten or mechanically damaged. A minimum voltage is essential to facilitate the release of electrons from the surface of the tip which in turn indirectly is used to obtain the tip curvature. Although this method has several advantages, a disadvantage is that the high electric field required for producing strong electric force can melt the apex of the tip, or might change the crystallographic tip nature.[10][62]
Scanning electron microscopy and transmission electron microscopy
[edit]The size and shape of the tip can be obtained by scanning electron microscopy and transmission electron microscopy measurements.[50][66] In addition, transmission electron microscopy (TEM) images are helpful to detect any layer of insulating materials on the surface of the tip as well as to estimate the size of the layer. These oxides are formed gradually on the surface of tip soon after fabrication, due to the oxidation of the metallic tip by reacting with the O2 present in the surrounding atmosphere.[63] Scanning electron microscopy (SEM) has a resolution limitation of below 4 nm, so TEM may be needed to observe even a single atom theoretically and practically. Tip grain down to 1-3 nm, thin polycrystalline oxides, or carbon or graphite layers at the tip apex, are routinely measured using TEM. The orientation of tip crystal, which is the angle between the tip plane in the single-crystal and the tip normal, can be estimated.[40][50][63][66][67]
Optical microscopy
[edit]In the past, optical microscopes were the only method used to investigate whether the tip is bent, through microscale imaging at many microscales. This is because the resolution limitation of an optical microscope is about 200 nm. Imaging software, including ImageJ, allows determination of the curvature, and aspect ratio of the tip. One drawback of this method is that it renders an image of tip, which is an object due to the uncertainty in the nanoscale dimension. This problem can be resolved by taking images of the tip multiple times, followed by combining them into an image by confocal microscope with some fluorescent material coating on the tip. It is also a time-consuming process due to the necessity of monitoring the wear or damage or degradation of the tip by collision with the surface during scanning the surface after each scan.[68][69][70][71][72]
Scanning tunneling spectroscopy
[edit]The scanning tunneling spectroscopy (STS) is spectroscopic form of STM. Spectroscopic data based on curvature is obtained to analyze the existence of any oxides or impurities on the tip. This is done by monitoring the linearity of the curve, which represents metallic tunnel junction.[73] Generally, the curve is non-linear; hence, the tip has a gap-like shape around zero bias voltage for oxidized or impure tip, whereas the opposite is observed for sharp pure un-oxidized tip.[74]
Auger electron spectroscopy, X-ray photoelectron spectroscopy
[edit]In Auger electron spectroscopy (AES), any oxides present on the tip surface are sputtered out during in-depth analysis with argon ion beam generated by differentially pumped ion pump, followed by comparing the sputtering rate of the oxide with experimental sputtering yields.[75] These Auger measurements may estimate the nature of oxides because of the surface contamination. Composition can also be revealed, and in some cases, thickness of the oxide layer down to 1-3 nm can be estimated. X-ray photoelectron spectroscopy also performs similar characterization for the chemical and surface composition, by providing information on the binding energy of the surface elements.[73][75]
Overall, the aforementioned characterization methods of tips can be categorized into three major classes.[76] They are as follows:
- Imaging tip using microscopy is used to take image of tip with microscopy, except scanning probe microscopy (SPM) e.g. scanning tunnelling microscopy (STM), atomic force microscopy (AFM) are reported.[70][71][72]
- Using known tip characterizer is when the shape of tip is deduced by taking an image of a sample of known measurement, which is known as tip characterizer.[77][78][79][80]
- Blind method is where tip characterizer of either known or unknown measurement is used.[81][82][83][84]
Applications
[edit]Probes tips have a wide variety of applications in different fields of science and technology. One of the major areas where probe tips are used is for application in SPM i.e., STM[36] and AFM.[85] For example, carbon nanotube tips in conjunction with AFM provides an excellent tool for surface characterization in the nanometer realm. CNT tips are also used in tapping-mode Scanning Force Microscopy (SFM), which is a technique where a tip taps a surface by a cantilever driven near resonant frequency of the cantilever. The CNT probe tips fabricated using CVD technique can be used for imaging of biological macromolecules,[86] semiconductor[35] and chemical structure.[32] For example, it is possible to obtain an intermittent AFM contact image of IgM macromolecules with excellent resolution using a single CNT tip. Individual CNT tips can be used for high resolution imaging of protein molecules.
In another application, multiwall carbon nanotube (MWCNT) and single wall carbon nanotube (SWCNT) tips were used to image amyloid β (1-40) derived protofibrils and fibrils by tapping mode AFM.[87] Functionalized probes can be used in Chemical Force Microscopy (CFM) to measure intermolecular forces and map chemical functionality.[88] Functionalized SWCNT probes can be used for chemically sensitive imaging with high lateral resolution and to study binding energy in chemical and biological system.[88] Probe tips that have been functionalized with either hydrophobic or hydrophilic molecules can be used to measure the adhesive interaction between hydrophobic-hydrophobic,[89] hydrophobic-hydrophilic,[90] and hydrophilic-hydrophilic[91] molecules. From these adhesive interactions the friction image of patterned sample surface can be found.[25] Probe tips used in force microscopy can provide imaging of structure and dynamics of adsorbate at the nanometer scale.[92] Self-assembled functionalized organic thiols on the surface of Au coated Si3N4 probe tips have been used to study the interaction between molecular groups.[93] Again, carbon nanotube probe tips in conjunction with AFM can be used for probing crevices that occur in microelectronic circuits with improved lateral resolution.[17] Functionality modified probe tips have been to measure the binding force between single protein-ligand pairs.[94] Probe tips have been used as a tapping mode technique to provide information about the elastic properties of materials.[95] Probe tips are also used in the mass spectrometer. Enzymatically active probe tips have been used for the enzymatic degradation of analytes. They have also been used as devices to introduce samples into the mass spectrophotometer. For example, trypsin-activated gold (Au/trypsin) probe tips can be used for the peptide mapping of the hen egg lysozyme.[96]
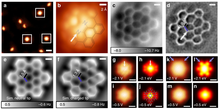
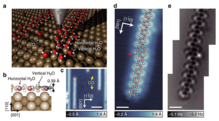
Atomically sharp probe tips can be used for imaging a single atom in a molecule.[32] An example of visualizing single atoms in water cluster can be seen in Fig. 10.[97] By visualizing single atoms in molecules present on a surface, scientists can determine bond length, bond order and discrepancies,[30][53] if any, in conjugation which was previously thought to be impossible in experimental work. Fig. 9 shows the experimentally determined bond order in a poly-aromatic compound, which was thought to be very hard in the past.[98]
References
[edit]- ^ Simpson, John A (1941). "A Scanning Device for Plotting Equipotential Lines". Review of Scientific Instruments. 12 (1): 37. Bibcode:1941RScI...12...37S. doi:10.1063/1.1769778.
- ^ Bowdler, G.W (1948). "The measurement of peak voltage at a frequency of 600 Mc/s by means of a modified probe circuit". Journal of the Institution of Electrical Engineers - Part I: General. 95 (87): 133–134. doi:10.1049/ji-1.1948.0064.
- ^ Müller, Erwin W. (1937-09-01). "Elektronenmikroskopische Beobachtungen von Feldkathoden". Zeitschrift für Physik (in German). 106 (9–10): 541–550. Bibcode:1937ZPhy..106..541M. doi:10.1007/BF01339895. S2CID 120836411.
- ^ a b Binnig, G.; Rohrer, H.; Gerber, Ch.; Weibel, E. (1982-07-05). "Surface Studies by Scanning Tunneling Microscopy". Physical Review Letters. 49 (1): 57–61. Bibcode:1982PhRvL..49...57B. doi:10.1103/PhysRevLett.49.57.
- ^ a b Binnig, G; Quate, C. F; Gerber, Ch (1986). "Atomic Force Microscope". Physical Review Letters. 56 (9): 930–933. Bibcode:1986PhRvL..56..930B. doi:10.1103/PhysRevLett.56.930. PMID 10033323.
- ^ Ximen, Hongyu; Russell, Phillip E (1992-07-01). "Micro-fabrication of AFM tips using focused ion and electron beam techniques". Ultramicroscopy. 42–44: 1526–1532. doi:10.1016/0304-3991(92)90477-2.
- ^ Albrecht, T. R; Akamine, S; Carver, T. E; Quate, C. F (1990). "Micro-fabrication of cantilever styli for the atomic force microscope". Journal of Vacuum Science & Technology A: Vacuum, Surfaces, and Films. 8 (4): 3386–3396. Bibcode:1990JVSTA...8.3386A. doi:10.1116/1.576520.
- ^ Ibe, J. P; Bey, P. P; Brandow, S. L; Brizzolara, R. A; Burnham, N. A; Dilella, D. P; Lee, K. P; Marrian, C. R. K; Colton, R. J (1990). "On the electrochemical etching of tips for scanning tunneling microscopy". Journal of Vacuum Science & Technology A: Vacuum, Surfaces, and Films. 8 (4): 3570–3575. Bibcode:1990JVSTA...8.3570I. doi:10.1116/1.576509.
- ^ a b Ekvall, Inger; Wahlström, Erik; Claesson, Dan; Olin, Håkan; Olsson, Eva (1999). "Preparation and characterization of electrochemically etched W tips for STM". Measurement Science and Technology. 10 (1): 11. Bibcode:1999MeScT..10...11E. doi:10.1088/0957-0233/10/1/006. S2CID 250840231.
- ^ a b c Müller, A.-D; Müller, F; Hietschold, M; Demming, F; Jersch, J; Dickmann, K (1999). "Characterization of electrochemically etched tungsten tips for scanning tunneling microscopy". Review of Scientific Instruments. 70 (10): 3970–3972. Bibcode:1999RScI...70.3970M. doi:10.1063/1.1150022.
- ^ a b Ju, Bing-Feng; Chen, Yuan-Liu; Ge, Yaozheng (2011). "The art of electrochemical etching for preparing tungsten probes with controllable tip profile and characteristic parameters". Review of Scientific Instruments. 82 (1): 013707–013707–8. Bibcode:2011RScI...82a3707J. doi:10.1063/1.3529880. PMID 21280837.
- ^ a b Chang, Wei-Tse; Hwang, Ing-Shouh; Chang, Mu-Tung; Lin, Chung-Yueh; Hsu, Wei-Hao; Hou, Jin-Long (2012). "Method of electrochemical etching of tungsten tips with controllable profiles". Review of Scientific Instruments. 83 (8): 083704–083704–6. Bibcode:2012RScI...83h3704C. doi:10.1063/1.4745394. PMID 22938300.
- ^ Khan, Yasser; Al-Falih, Hisham; Zhang, Yaping; Ng, Tien Khee; Ooi, Boon S. (June 2012). "Two-step controllable electrochemical etching of tungsten scanning probe microscopy tips". Review of Scientific Instruments. 83 (6): 063708–063708–8. Bibcode:2012RScI...83f3708K. doi:10.1063/1.4730045. hdl:10754/312975. PMID 22755635.
- ^ a b Bani Milhim, Alaeddin; Ben Mrad, Ridha (2014). "Electrochemical etching technique: Conical-long-sharp tungsten tips for nano-applications". Journal of Vacuum Science & Technology B, Nanotechnology and Microelectronics: Materials, Processing, Measurement, and Phenomena. 32 (3): 031806. doi:10.1116/1.4873700.
- ^ Valencia, Victor A; Thaker, Avesh A; Derouin, Jonathan; Valencia, Damian N; Farber, Rachael G; Gebel, Dana A; Killelea, Daniel R (2015). "Preparation of scanning tunneling microscopy tips using pulsed alternating current etching". Journal of Vacuum Science & Technology A: Vacuum, Surfaces, and Films. 33 (2): 023001. Bibcode:2015JVSTA..33b3001V. doi:10.1116/1.4904347.
- ^ a b c Schoelz, James K; Xu, Peng; Barber, Steven D; Qi, Dejun; Ackerman, Matthew L; Basnet, Gobind; Cook, Cameron T; Thibado, Paul M (2012). "High-percentage success method for preparing and pre-evaluating tungsten tips for atomic-resolution scanning tunneling microscopy". Journal of Vacuum Science & Technology B, Nanotechnology and Microelectronics: Materials, Processing, Measurement, and Phenomena. 30 (3): 033201. arXiv:1502.01641. Bibcode:2012JVSTB..30c3201S. doi:10.1116/1.3701977. S2CID 119286180.
- ^ a b c d e f Dai, Hongjie; Hafner, Jason H.; Rinzler, Andrew G.; Colbert, Daniel T.; Smalley, Richard E. (November 1996). "Nanotubes as nanoprobes in scanning probe microscopy". Nature. 384 (6605): 147–50. Bibcode:1996Natur.384..147D. doi:10.1038/384147a0. S2CID 4328402.
- ^ Li, Jun; Cassell, Alan M.; Dai, Hongjie (1999-08-01). "Carbon nanotubes as AFM tips: measuring DNA molecules at the liquid/solid interface". Surface and Interface Analysis. 28 (1): 8–11. doi:10.1002/(sici)1096-9918(199908)28:1<8::aid-sia610>3.0.co;2-4.
- ^ a b c d e Lee, Jae Seol; Song, Jungki; Kim, Seong Oh; Kim, Seokbeom; Lee, Wooju; Jackman, Joshua A.; Kim, Dongchoul; Cho, Nam-Joon; Lee, Jungchul (2016-05-20). "Multifunctional hydrogel nano-probes for atomic force microscopy". Nature Communications. 7: 11566. Bibcode:2016NatCo...711566L. doi:10.1038/ncomms11566. PMC 4876479. PMID 27199165.
- ^ a b Houzé, F; Meyer, R; Schneegans, O; Boyer, L (1996). "Imaging the local electrical properties of metal surfaces by atomic force microscopy with conducting probes". Applied Physics Letters. 69 (13): 1975–1977. Bibcode:1996ApPhL..69.1975H. doi:10.1063/1.117179.
- ^ a b Kaiser, Uwe; Schwarz, Alexander; Wiesendanger, Roland (March 2007). "Magnetic exchange force microscopy with atomic resolution". Nature. 446 (7135): 522–5. Bibcode:2007Natur.446..522K. doi:10.1038/nature05617. PMID 17392782. S2CID 4370906.
- ^ a b c d Gray, Robert C.; Fishman, Victor A.; Bard, Allen J. (May 1977). "Simple sample cell for examination of solids and liquids by photo-acoustic spectroscopy". Analytical Chemistry. 49 (6): 697–700. doi:10.1021/ac50014a009.
- ^ a b c Inouye, Yasushi; Kawata, Satoshi (1994). "Near-field scanning optical microscope with a metallic probe tip". Optics Letters. 19 (3): 159. Bibcode:1994OptL...19..159I. doi:10.1364/OL.19.000159. PMID 19829577.
- ^ a b Müller, M (2002). "Science, medicine, and the future: Micro-dialysis". BMJ. 324 (7337): 588–91. doi:10.1136/bmj.324.7337.588. PMC 1122512. PMID 11884326.
- ^ a b c d Frisbie, C. Daniel; Rozsnyai, Lawrence F.; Noy, Aleksandr; Wrighton, Mark S.; Lieber, Charles M. (1994-09-30). "Functional Group Imaging by Chemical Force Microscopy". Science. 265 (5181): 2071–4. Bibcode:1994Sci...265.2071F. doi:10.1126/science.265.5181.2071. PMID 17811409. S2CID 1192124.
- ^ a b Wolf, E. L (2011). "Introduction". Principles of Electron Tunneling Spectroscopy Second Edition. pp. 1–22. doi:10.1093/acprof:oso/9780199589494.003.0001. ISBN 9780199589494.
- ^ Atkins, P. (2006). Atkin's Physical Chemistry. New York. p. 77.
{{cite book}}: CS1 maint: location missing publisher (link) - ^ Rajasekaran, Pradeep Ramiah; Zhou, Chuanhong; Dasari, Mallika; Voss, Kay-Obbe; Trautmann, Christina; Kohli, Punit (2017-06-01). "Polymeric lithography editor: Editing lithographic errors with nanoporous polymeric probes". Science Advances. 3 (6): e1602071. Bibcode:2017SciA....3E2071R. doi:10.1126/sciadv.1602071. PMC 5466373. PMID 28630898.
- ^ a b Allen, S; Davies, J; Dawkes, A.C; Davies, M.C; Edwards, J.C; Parker, M.C; Roberts, C.J; Sefton, J; Tendler, S.J.B; Williams, P.M (1996). "In situ observation of streptavidin-biotin binding on an immunoassay well surface using an atomic force microscope". FEBS Letters. 390 (2): 161–164. doi:10.1016/0014-5793(96)00651-5. PMID 8706850.
- ^ a b c d Gross, Leo; Mohn, Fabian; Moll, Nikolaj; Schuler, Bruno; Criado, Alejandro; Guitián, Enrique; Peña, Diego; Gourdon, André; Meyer, Gerhard (2012-09-14). "Bond-Order Discrimination by Atomic Force Microscopy". Science. 337 (6100): 1326–9. Bibcode:2012Sci...337.1326G. doi:10.1126/science.1225621. PMID 22984067. S2CID 206542919.
- ^ Uchihashi, Takayuki; Iino, Ryota; Ando, Toshio; Noji, Hiroyuki (2011-08-05). "High-Speed Atomic Force Microscopy Reveals Rotary Catalysis of Rotorless F1-ATPase". Science. 333 (6043): 755–8. Bibcode:2011Sci...333..755U. doi:10.1126/science.1205510. hdl:2297/28580. PMID 21817054. S2CID 21492596.
- ^ a b c d e f Gross, Leo; Mohn, Fabian; Moll, Nikolaj; Liljeroth, Peter; Meyer, Gerhard (2009-08-28). "The Chemical Structure of a Molecule Resolved by Atomic Force Microscopy". Science. 325 (5944): 1110–4. Bibcode:2009Sci...325.1110G. doi:10.1126/science.1176210. PMID 19713523. S2CID 9346745.
- ^ Wendel, M.; Lorenz, H.; Kotthaus, J. P. (1995-12-18). "Sharpened electron beam deposited tips for high resolution atomic force microscope lithography and imaging". Applied Physics Letters. 67 (25): 3732–3734. Bibcode:1995ApPhL..67.3732W. doi:10.1063/1.115365.
- ^ Niedermann, P; Hänni, W; Morel, D; Perret, A; Skinner, N; Indermühle, P.-F; Not Available, N.-F. de Rooij (1998). "CVD diamond probes for nanotechnology" (PDF). Applied Physics A: Materials Science & Processing. 66 (7): S31–S34. Bibcode:1998ApPhA..66S..31N. doi:10.1007/s003390051094. S2CID 97572443.
- ^ a b Nguyen, Cattien V.; Chao, Kuo-Jen; Stevens, Ramsey M. D.; Delzeit, Lance; Cassell, Alan; Han, Jie; Meyyappan, M. (2001). "Carbon nanotube tip probes: stability and lateral resolution in scanning probe microscopy and application to surface science in semiconductors". Nanotechnology. 12 (3): 363. Bibcode:2001Nanot..12..363N. doi:10.1088/0957-4484/12/3/326. hdl:2060/20010091009. S2CID 46936386.
- ^ a b Tersoff, J.; Hamann, D. R. (1983-06-20). "Theory and Application for the Scanning Tunneling Microscope". Physical Review Letters. 50 (25): 1998–2001. Bibcode:1983PhRvL..50.1998T. doi:10.1103/PhysRevLett.50.1998.
- ^ Müller, Daniel J.; Dufrêne, Yves F. (May 2008). "Atomic force microscopy as a multi-functional molecular toolbox in nano-biotechnology". Nature Nanotechnology. 3 (5): 261–9. Bibcode:2008NatNa...3..261M. doi:10.1038/nnano.2008.100. PMID 18654521.
- ^ Barattin, Régis; Voyer, Normand (2008). "Chemical modifications of AFM tips for the study of molecular recognition events". Chemical Communications (13): 1513–32. doi:10.1039/B614328H. PMID 18354789.
- ^ Gorbunov, A. A; Wolf, B; Edelmann, J (1993). "The use of silver tips in scanning tunneling microscopy". Review of Scientific Instruments. 64 (8): 2393–2394. Bibcode:1993RScI...64.2393G. doi:10.1063/1.1143892.
- ^ a b c d Garnaes, J; Kragh, F; Mo/Rch, K. A; Thölén, A. R (1990). "Transmission electron microscopy of scanning tunneling tips". Journal of Vacuum Science & Technology A: Vacuum, Surfaces, and Films. 8 (1): 441–444. Bibcode:1990JVSTA...8..441G. doi:10.1116/1.576417.
- ^ a b Mate, C. Mathew; McClelland, Gary M.; Erlandsson, Ragnar; Chiang, Shirley (1987-10-26). "Atomic-scale friction of a tungsten tip on a graphite surface". Physical Review Letters. 59 (17): 1942–1945. Bibcode:1987PhRvL..59.1942M. doi:10.1103/PhysRevLett.59.1942. PMID 10035374.
- ^ a b Liu, Hsue Yang.; Fan, Fu Ren F.; Lin, Charles W.; Bard, Allen J. (June 1986). "Scanning electrochemical and tunneling ultramicroelectrode microscope for high-resolution examination of electrode surfaces in solution". Journal of the American Chemical Society. 108 (13): 3838–3839. doi:10.1021/ja00273a054.
- ^ Lazarev, Alexander; Fang, Nicholas; Luo, Qi; Zhang, Xiang (2003). "Formation of fine near-field scanning optical microscopy tips. Part II. By laser-heated pulling and bending". Review of Scientific Instruments. 74 (8): 3684–3688. Bibcode:2003RScI...74.3684L. doi:10.1063/1.1589584.
- ^ Essaidi, N.; Chen, Y.; Kottler, V.; Cambril, E.; Mayeux, C.; Ronarch, N.; Vieu, C. (1998-02-01). "Fabrication and characterization of optical-fiber nanoprobes for scanning near-field optical microscopy". Applied Optics. 37 (4): 609–615. Bibcode:1998ApOpt..37..609E. doi:10.1364/AO.37.000609. PMID 18268630.
- ^ a b c d e Gobind, Basnet (2013). Fabrication of Tungsten Tips Suitable for Scanning Probe Microscopy by Electrochemical Etching Methods (Thesis). University of Arkansas, Fayetteville.
- ^ Cheung, Chin Li; Hafner, Jason H.; Lieber, Charles M. (2000-04-11). "Carbon nanotube atomic force microscopy tips: Direct growth by chemical vapor deposition and application to high-resolution imaging". Proceedings of the National Academy of Sciences. 97 (8): 3809–13. Bibcode:2000PNAS...97.3809C. doi:10.1073/pnas.050498597. PMC 18098. PMID 10737761.
- ^ Martinez, J.; Yuzvinsky, T. D.; Fennimore, A. M.; Zettl, A.; García, R.; Bustamante, C. (2005). "Length control and sharpening of atomic force microscope carbon nanotube tips assisted by an electron beam" (PDF). Nanotechnology. 16 (11): 2493. Bibcode:2005Nanot..16.2493M. doi:10.1088/0957-4484/16/11/004. S2CID 169215.
- ^ Lucier, Anne-Sophie; Mortensen, Henrik; Sun, Yan; Grütter, Peter (2005-12-19). "Determination of the atomic structure of scanning probe microscopy tungsten tips by field ion microscopy". Physical Review B. 72 (23): 235420. Bibcode:2005PhRvB..72w5420L. doi:10.1103/PhysRevB.72.235420.
- ^ Meister, A; Liley, M; Brugger, J; Pugin, R; Heinzelmann, H (2004). "Nanodispenser for attoliter volume deposition using atomic force microscopy probes modified by focused-ion-beam milling" (PDF). Applied Physics Letters. 85 (25): 6260–6262. Bibcode:2004ApPhL..85.6260M. doi:10.1063/1.1842352.
- ^ a b c d Zhang, R (1996). "Preparation of sharp polycrystalline tungsten tips for scanning tunneling microscopy imaging". Journal of Vacuum Science & Technology B: Microelectronics and Nanometer Structures. 14 (1): 1–10. Bibcode:1996JVSTB..14....1Z. doi:10.1116/1.589029.
- ^ Lee, Chanwoo; Kim, Sung Tae; Jeong, Byeong Geun; Yun, Seok Joon; Song, Young Jae; Lee, Young Hee; Park, Doo Jae; Jeong, Mun Seok (2017-01-13). "Tip-Enhanced Raman Scattering Imaging of Two-Dimensional Tungsten Disulfide with Optimized Tip Fabrication Process". Scientific Reports. 7: 40810. Bibcode:2017NatSR...740810L. doi:10.1038/srep40810. PMC 5234014. PMID 28084466.
- ^ Kim, Minjung; Chelikowsky, James R (2015). "CO tip functionalization in subatomic resolution atomic force microscopy". Applied Physics Letters. 107 (16): 163109. Bibcode:2015ApPhL.107p3109K. doi:10.1063/1.4934273.
- ^ a b Zhang, Jun; Chen, Pengcheng; Yuan, Bingkai; Ji, Wei; Cheng, Zhihai; Qiu, Xiaohui (2013-11-01). "Real-Space Identification of Intermolecular Bonding with Atomic Force Microscopy". Science. 342 (6158): 611–614. Bibcode:2013Sci...342..611Z. doi:10.1126/science.1242603. PMID 24072819. S2CID 42302237.
- ^ Kulisch, W; Ackermann, L; Sobisch, B (1996). "On the Mechanisms of Bias Enhanced Nucleation of Diamond". Physica Status Solidi A. 154 (1): 155–174. Bibcode:1996PSSAR.154..155K. doi:10.1002/pssa.2211540113.
- ^ Germann, G. J; McClelland, G. M; Mitsuda, Y; Buck, M; Seki, H (1992). "Diamond force microscope tips fabricated by chemical vapor deposition". Review of Scientific Instruments. 63 (9): 4053–4055. Bibcode:1992RScI...63.4053G. doi:10.1063/1.1143265.
- ^ Calafiore, Giuseppe; Koshelev, Alexander; Darlington, Thomas P.; Borys, Nicholas J.; Melli, Mauro; Polyakov, Aleksandr; Cantarella, Giuseppe; Allen, Frances I.; Lum, Paul (2017-05-10). "Campanile Near-Field Probes Fabricated by Nanoimprint Lithography on the Facet of an Optical Fiber". Scientific Reports. 7 (1): 1651. Bibcode:2017NatSR...7.1651C. doi:10.1038/s41598-017-01871-5. PMC 5431761. PMID 28490793.
- ^ Nguyen, Cattien V.; Ye, Qi; Meyyappan, M. (2005). "Carbon nanotube tips for scanning probe microscopy: fabrication and high aspect ratio nanometrology". Measurement Science and Technology. 16 (11): 2138. doi:10.1088/0957-0233/16/11/003. S2CID 121141040.
- ^ a b c d Méndez, J; Luna, M; Baró, A.M (1992). "Preparation of STM W tips and characterization by FEM, TEM and SEM". Surface Science. 266 (1–3): 294–298. Bibcode:1992SurSc.266..294M. doi:10.1016/0039-6028(92)91036-B.
- ^ Method of cleaning probe tips of cards and apparatus for implementing the method, 1996-04-03, retrieved 2018-05-15
- ^ Frammelsberger, Werner; Benstetter, Guenther; Kiely, Janice; Stamp, Richard (2007). "C-AFM-based thickness determination of thin and ultra-thin SiO 2 films by use of different conductive-coated probe tips". Applied Surface Science. 253 (7): 3615–3626. Bibcode:2007ApSS..253.3615F. doi:10.1016/j.apsusc.2006.07.070.
- ^ Dai, Gaoliang; Pohlenz, Frank; Danzebrink, Hans-Ulrich; Xu, Min; Hasche, Klaus; Wilkening, Guenter (2004). "Metrological large range scanning probe microscope". Review of Scientific Instruments. 75 (4): 962–969. Bibcode:2004RScI...75..962D. doi:10.1063/1.1651638.
- ^ a b Meyer, J.A; Stranick, S.J; Wang, J.B; Weiss, P.S (1992-07-01). "Field emission current-voltage curves as a diagnostic for scanning tunneling microscope tips" (PDF). Ultramicroscopy. 42–44: 1538–1541. doi:10.1016/0304-3991(92)90479-4. Archived from the original (PDF) on July 27, 2018.
- ^ a b c Biegelsen, D. K; Ponce, F. A; Tramontana, J. C; Koch, S. M (1987). "Ion milled tips for scanning tunneling microscopy". Applied Physics Letters. 50 (11): 696–698. Bibcode:1987ApPhL..50..696B. doi:10.1063/1.98070.
- ^ Lisowski, W; Van Den Berg, A. H. J; Kip, G. A. M; Hanekamp, L. J (1991). "Characterization of tungsten tips for STM by SEM/AES/XPS" (PDF). Fresenius' Journal of Analytical Chemistry. 341 (3–4): 196–199. doi:10.1007/BF00321548. S2CID 30174156.
- ^ De Heer, W. A; Ch Telain, A; Ugarte, D (1995). "A Carbon Nanotube Field-Emission Electron Source". Science. 270 (5239): 1179–1180. Bibcode:1995Sci...270.1179D. doi:10.1126/science.270.5239.1179. S2CID 179090084.
- ^ a b Hutter, Jeffrey L; Bechhoefer, John (1993). "Calibration of atomic-force microscope tips". Review of Scientific Instruments. 64 (7): 1868–1873. Bibcode:1993RScI...64.1868H. doi:10.1063/1.1143970.
- ^ Fasth, J E; Loberg, B; Nordén, H (1967). "Preparation of contamination-free tungsten specimens for the field-ion microscope". Journal of Scientific Instruments. 44 (12): 1044–1045. doi:10.1088/0950-7671/44/12/428.
- ^ Cricenti, A; Paparazzo, E; Scarselli, M. A; Moretto, L; Selci, S (1994). "Preparation and characterization of tungsten tips for scanning tunneling microscopy". Review of Scientific Instruments. 65 (5): 1558–1560. Bibcode:1994RScI...65.1558C. doi:10.1063/1.1144891.
- ^ Colton, R. J; Baker, S. M; Baldeschwieler, J. D; Kaiser, W. J (1987). "Oxide-free tip for scanning tunneling microscopy" (PDF). Applied Physics Letters. 51 (5): 305–307. Bibcode:1987ApPhL..51..305C. doi:10.1063/1.98451.
- ^ a b Hacker, B; Hillebrand, A; Hartmann, T; Guckenberger, R (1992-07-01). "Preparation and characterization of tips for scanning tunneling microscopy of biological specimens". Ultramicroscopy. 42–44: 1514–1518. doi:10.1016/0304-3991(92)90475-Y.
- ^ a b Schwarz, U. D; Haefke, H; Reimann, P; Güntherodt, H.-J (1994). "Tip artefacts in scanning force microscopy". Journal of Microscopy. 173 (3): 183–197. doi:10.1111/j.1365-2818.1994.tb03441.x. S2CID 93465874.
- ^ a b DeRose, J. A.; Revel, J.-P. (May 1997). "Examination of Atomic (Scanning) Force Microscopy Probe Tips with the Transmission Electron Microscope". Microscopy and Microanalysis. 3 (3): 203–213. Bibcode:1997MiMic...3..203D. doi:10.1017/S143192769797015X. ISSN 1435-8115. S2CID 137851516.
- ^ a b Feenstra, Randall M (1994). "Scanning tunneling spectroscopy". Surface Science. 299–300: 965–979. Bibcode:1994SurSc.299..965F. doi:10.1016/0039-6028(94)90710-2.
- ^ Feenstra, R.M; Stroscio, Joseph A; Fein, A.P (1987). "Tunneling spectroscopy of the Si(111)2 × 1 surface". Surface Science. 181 (1–2): 295–306. Bibcode:1987SurSc.181..295F. doi:10.1016/0039-6028(87)90170-1.
- ^ a b Chang, Chuan C (1971). "Auger electron spectroscopy". Surface Science. 25 (1): 53–79. Bibcode:1971SurSc..25...53C. doi:10.1016/0039-6028(71)90210-X.
- ^ Dongmo, Samuel; Villarrubia, John S.; Jones, Samuel N.; Renegar, Thomas B.; Postek, Michael T.; Song, Jun-Feng (1998-03-01). "Tip Characterization for Scanned Probe Microscope Width Metrology". NIST.
- ^ Hierlemann, Andreas; K. Campbell, J; Baker, Lane; M. Crooks, R; Ricco, Antonio (1998-06-01). "Structural Distortion of Dendrimers on Gold Surfaces: A Tapping-Mode AFM Investigation". Journal of the American Chemical Society. 120 (21): 5323–5324. doi:10.1021/ja974283f.
- ^ VAN CLEEF, M.; HOLT, S. A.; WATSON, G. S.; MYHRA, S. (January 1996). "Polystyrene spheres on mica substrates: AFM calibration, tip parameters and scan artefacts". Journal of Microscopy. 181 (1): 2–9. doi:10.1046/j.1365-2818.1996.74351.x. S2CID 96004404.
- ^ Todd, Brian A; Eppell, Steven J (2001). "A method to improve the quantitative analysis of SFM images at the nanoscale". Surface Science. 491 (3): 473–483. Bibcode:2001SurSc.491..473T. doi:10.1016/S0039-6028(01)01313-9.
- ^ Dixson, Ronald G; Koening, Rainer G; Tsai, Vincent W; Fu, Joseph; Vorburger, Theodore V (1999). "Dimensional metrology with the NIST calibrated atomic force microscope". In Singh, Bhanwar (ed.). Metrology, Inspection, and Process Control for Microlithography XIII. Vol. 3677. p. 20. doi:10.1117/12.350822. S2CID 136723937.
- ^ Dongmo, Samuel (1996-03-01). "Blind restoration method of scanning tunneling and atomic force microscopy images". Journal of Vacuum Science & Technology B: Microelectronics and Nanometer Structures. 14 (2): 1552. Bibcode:1996JVSTB..14.1552D. doi:10.1116/1.589137.
- ^ Villarrubia, J. S (1996). "Scanned probe microscope tip characterization without calibrated tip characterizers". Journal of Vacuum Science & Technology B: Microelectronics and Nanometer Structures. 14 (2): 1518–1521. Bibcode:1996JVSTB..14.1518V. doi:10.1116/1.589130.
- ^ Williams, P. M (1996). "Blind reconstruction of scanning probe image data". Journal of Vacuum Science & Technology B: Microelectronics and Nanometer Structures. 14 (2): 1557–1562. Bibcode:1996JVSTB..14.1557W. doi:10.1116/1.589138.
- ^ Villarrubia, J. S. (July 1997). "Algorithms for Scanned Probe Microscope Image Simulation, Surface Reconstruction, and Tip Estimation". Journal of Research of the National Institute of Standards and Technology. 102 (4): 425–454. doi:10.6028/jres.102.030. PMC 4882144. PMID 27805154.
- ^ Yu, Min-Feng; Lourie, Oleg; Dyer, Mark J.; Moloni, Katerina; Kelly, Thomas F.; Ruoff, Rodney S. (2000-01-28). "Strength and Breaking Mechanism of Multiwalled Carbon Nanotubes Under Tensile Load". Science. 287 (5453): 637–640. Bibcode:2000Sci...287..637Y. doi:10.1126/science.287.5453.637. PMID 10649994.
- ^ Hafner, Jason H.; Cheung, Chin Li; Lieber, Charles M. (April 1999). "Growth of nanotubes for probe microscopy tips" (PDF). Nature. 398 (6730): 761–762. Bibcode:1999Natur.398..761H. doi:10.1038/19658. S2CID 4425038.
- ^ Wong, Stanislaus S.; Harper, James D.; Lansbury, Peter T.; Lieber, Charles M. (January 1998). "Carbon Nanotube Tips: High-Resolution Probes for Imaging Biological Systems". Journal of the American Chemical Society. 120 (3): 603–604. doi:10.1021/ja9737735.
- ^ a b Wong, Stanislaus S.; Woolley, Adam T.; Joselevich, Ernesto; Cheung, Chin Li; Lieber, Charles M. (August 1998). "Covalently-Functionalized Single-Walled Carbon Nanotube Probe Tips for Chemical Force Microscopy". Journal of the American Chemical Society. 120 (33): 8557–8. doi:10.1021/ja9817803.
- ^ Wang, Zhigang; Zhou, Chunqing; Wang, Chen; Wan, Lijun; Fang, Xiaohong; Bai, Chunli (October 2003). "AFM and STM study of beta-amyloid aggregation on graphite". Ultramicroscopy. 97 (1–4): 73–79. doi:10.1016/S0304-3991(03)00031-7. PMID 12801659.
- ^ Wilson, Neil R.; Macpherson, Julie V. (2009-07-13). "Carbon nanotube tips for atomic force microscopy". Nature Nanotechnology. 4 (8): 483–491. Bibcode:2009NatNa...4..483W. doi:10.1038/nnano.2009.154. PMID 19662008.
- ^ Patel, N.; Davies, M. C.; Heaton, R. J.; Roberts, C. J.; Tendler, S. J. B.; Williams, P. M. (1998-03-01). "A scanning probe microscopy study of the physisorption and chemisorption of protein molecules onto carboxylate terminated self-assembled monolayers". Applied Physics A. 66 (1): S569–S574. doi:10.1007/s003390051203. S2CID 95572322.
- ^ Noy, Aleksandr; Frisbie, C. Daniel; Rozsnyai, Lawrence F.; Wrighton, Mark S.; Lieber, Charles M. (August 1995). "Chemical Force Microscopy: Exploiting Chemically-Modified Tips To Quantify Adhesion, Friction, and Functional Group Distributions in Molecular Assemblies". Journal of the American Chemical Society. 117 (30): 7943–7951. doi:10.1021/ja00135a012.
- ^ Frisbie, C. D.; Rozsnyai, L. F.; Noy, A.; Wrighton, M. S.; Lieber, C. M. (1994-09-30). "Functional group imaging by chemical force microscopy". Science. 265 (5181): 2071–2074. Bibcode:1994Sci...265.2071F. doi:10.1126/science.265.5181.2071. PMID 17811409. S2CID 1192124.
- ^ Lieber, Charles M.; Wong, Stanislaus S.; Joselevich, Ernesto; Woolley, Adam T.; Cheung, Chin Li (1998-07-02). "Covalently functionalized nanotubes as nanometre- sized probes in chemistry and biology" (PDF). Nature. 394 (6688): 52–55. Bibcode:1998Natur.394...52W. doi:10.1038/27873. PMID 9665127. S2CID 4353198.
- ^ Howard, A. J.; Rye, R. R.; Houston, J. E. (1996-02-15). "Nanomechanical basis for imaging soft materials with tapping mode atomic force microscopy". Journal of Applied Physics. 79 (4): 1885–1890. Bibcode:1996JAP....79.1885H. doi:10.1063/1.361090.
- ^ Dogruel, David.; Williams, Peter.; Nelson, Randall W. (December 1995). "Rapid Tryptic Mapping Using Enzymically Active Mass Spectrometer Probe Tips". Analytical Chemistry. 67 (23): 4343–4348. doi:10.1021/ac00119a022. PMID 8633777.
- ^ a b Shiotari, Akitoshi; Sugimoto, Yoshiaki (2017-02-03). "Ultrahigh-resolution imaging of water networks by atomic force microscopy". Nature Communications. 8: 14313. Bibcode:2017NatCo...814313S. doi:10.1038/ncomms14313. PMC 5296746. PMID 28155856.
- ^ a b Wang, Xiao-Ye; Richter, Marcus; He, Yuanqin; Björk, Jonas; Riss, Alexander; Rajesh, Raju; Garnica, Manuela; Hennersdorf, Felix; Weigand, Jan J; Narita, Akimitsu; Berger, Reinhard; Feng, Xinliang; Auwärter, Willi; Barth, Johannes V; Palma, Carlos-Andres; Müllen, Klaus (2017). "Exploration of pyrazine-embedded antiaromatic polycyclic hydrocarbons generated by solution and on-surface azomethine ylide homocoupling". Nature Communications. 8 (1): 1948. Bibcode:2017NatCo...8.1948W. doi:10.1038/s41467-017-01934-1. PMC 5717246. PMID 29208962.


![{\displaystyle [\log _{10}(1/V^{2})vs.(1/V)]}](https://wikimedia.org/api/rest_v1/media/math/render/svg/452883eeb37076f292ee97d8740162b19af6b757)